Case Study 3 - Return Loss Fails on DTX CableAnalyzer due to water in cable

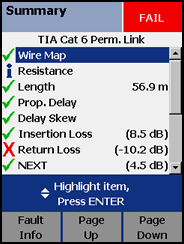
You can also  click here to see a video of Adrian Young from our Technical Assistance Center walking you through these steps.

In this case study, the installer was failing Return Loss when certifying a number of category 6 permanent links. With the DTX CableAnalyzer, it is possible to discover why these links were failing. 

After the AUTOTEST, the installer was presented with the following DTX CableAnalyzer test result.


Your DTX CableAnalyzer can help you diagnose the Return Loss failure. Let's review the process. Do not skip Step 1 please.

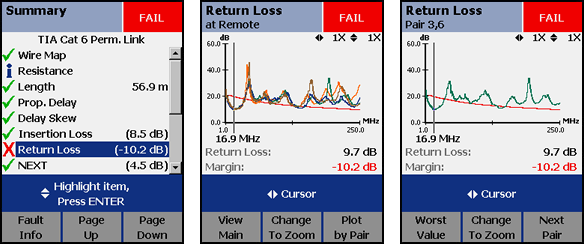
Step 1
Find out which pair combination of Return Loss is causing the FAIL. 
  • Highlight Return Loss.
  • Press the ENTER key.
  • Press the F3 to display the worst pair.


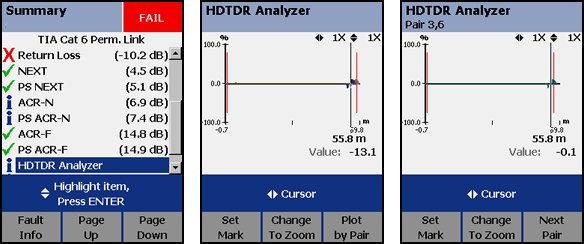
Here we see that Pair 3,6 is the worst pair, although they all appear to be failing about the same - that's a clue. Whenever you see a Return Loss trace that fails at the lower frequencies, it's probably a cable issue. And when all four pairs fail at the lower frequencies and follow each other, as in this example, it's a sign of water/moisture in the cable. Do not confuse moisture with too much lubricant. Too much lubricant will cause a different failure. But where in the link is the water?

Step 2
Look at the HDTDR Analyzer trace for this failing pair.
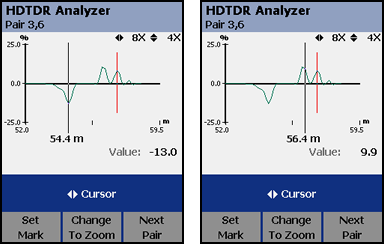
  • Press the EXIT key twice to return to the main screen.
  • Highlight HDTDR Analyzer.
  • Press the ENTER key.
  • Press the F3 until you get to the marginal pair, in this case: Pair 3,6.


Step 3
Analyze the trace. What you are seeing is where the impedance anomalies are in the link. It's these anomalies that cause Return Loss. The cursor automatically goes to the largest impedance anomaly. It's difficult to see what is going on. You can zoom in on this event to get a better picture:

  • Press the F2 key.
  • Press the up cursor key.
  • Press the right cursor key.


  • Press the F2 key after you have zoomed in.
  • Move the cursor to the first event, note the distance. Then move the cursor the second event, again noting the distance.


At 54.4 m, you see a value of -13.0. This means that the impedance of the cable has changed by 13%. If the cable before 54.4 m was 100 Ohms, it means the cable now has an impedance of 87 Ohms. The cable remains at 87 Ohms until you reach the next peek where the value is 9.9. Assumnig the cable was 87 Ohms until this point, the cable then becomes 95.6 Ohms. The final peek brings it back to 100 Ohms.

The water is in the last 2 to 3 meters of the link.

If you have "Store Plot Data" enabled in your DTX CableAnalyzer, these graphs will be available to analyze in LinkWare PC Software.
  
Conclusion: 
The cable needs to be replaced.

Tip:
It's impossible to dry out the cable. The water will have penetrated the outer sheathing. You will need to remove/replace the cable. If it is in conduit, the challenge is to dry out the conduit. Blowing air into the conduit does not work. I have heard of installers tying high absorbency cloths to the pull wire and pulling the cloth through the conduit with a certain amount of success.